Hey friends, how are you smart home lovers! I am Faizan Ali, and if you are reading this then chances are that you have already partly stepped into the enjoyable (and sometimes frustrating) world of Home Assistant, local control, and network segmentation.
You might be trying to run your Tuya devices locally through Local Tuya integration, but they are sitting on a different VLAN and absolutely refusing to be discovered. Believe me, I’ve been through all of this too – I’ve wanted to pull my hair out so many times that I’ve lost count. It feels utterly exasperating, right?
But don’t worry! This is not just your problem, we all have to face these challenges when we want better security and privacy for our smart homes. We want IoT devices to be on their own network, away from the main network, and Home Assistant still be the boss of all. The good news is that there is a solution to this! And I’m going to share those steps with you. The ones I followed to solve my Home Assistant Local Tuya VLAN problem.
Why Your Home Assistant Local Tuya VLAN Troubleshooting Journey Is Necessary
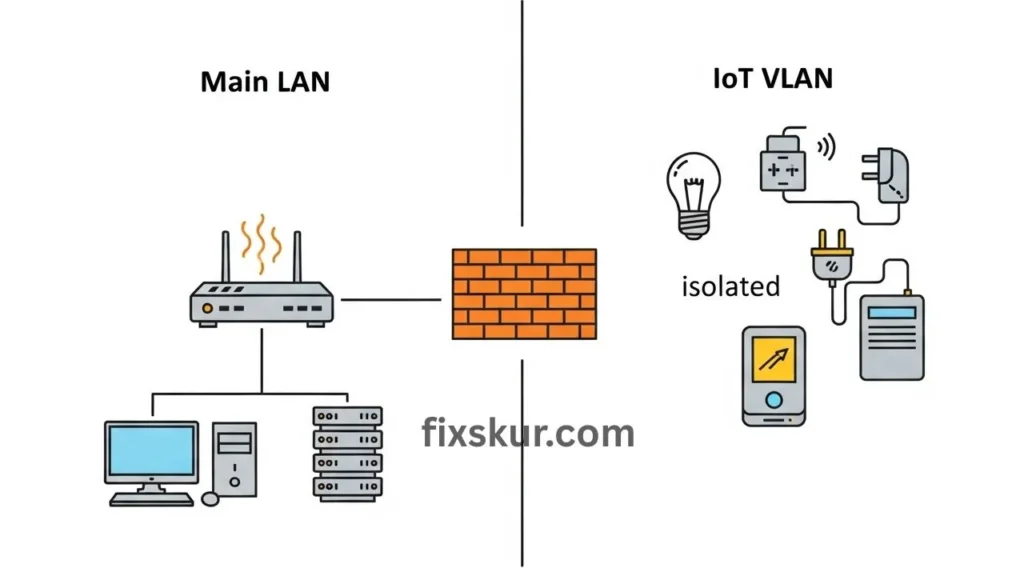
First, let’s discuss why you’re doing all this. Why go through the trouble of VLANs and local control? Think of it this way – you have more than a dozen smart devices, all from different companies, and they’re all talking on the same network. It’s kind of like when you have a party at home and every guest barges into any room without permission. It’s not a good scene for both security and performance, is it?
VLANs (Virtual Local Area Networks) provide the option to divide your network into smaller, separate logical networks. This means you can put your smart bulbs, plugs, and sensors on a dedicated “IoT VLAN” and limit their communication. The advantage is that if a cheap smart plug ever gets hacked, it won’t make it straight to your computer where your sensitive data is stored. In simple terms, this is an important way to make a smart home more secure. Here is the next step.
Advantages of Local Tuya Integration
Now consider the Local Tuya integration as the icing on the cake. Instead of depending on Tuya’s cloud servers (where there is a risk of privacy issues and delay), Local Tuya allows Home Assistant to communicate directly with your devices on your own local network. The result? Fast speed, better reliability and most importantly — your data will stay with you only.
The only problem is, running these two awesome things together can get a little tricky, especially when it comes to device discovery.
Understanding the Core Issue: UDP Broadcasts Across VLANs
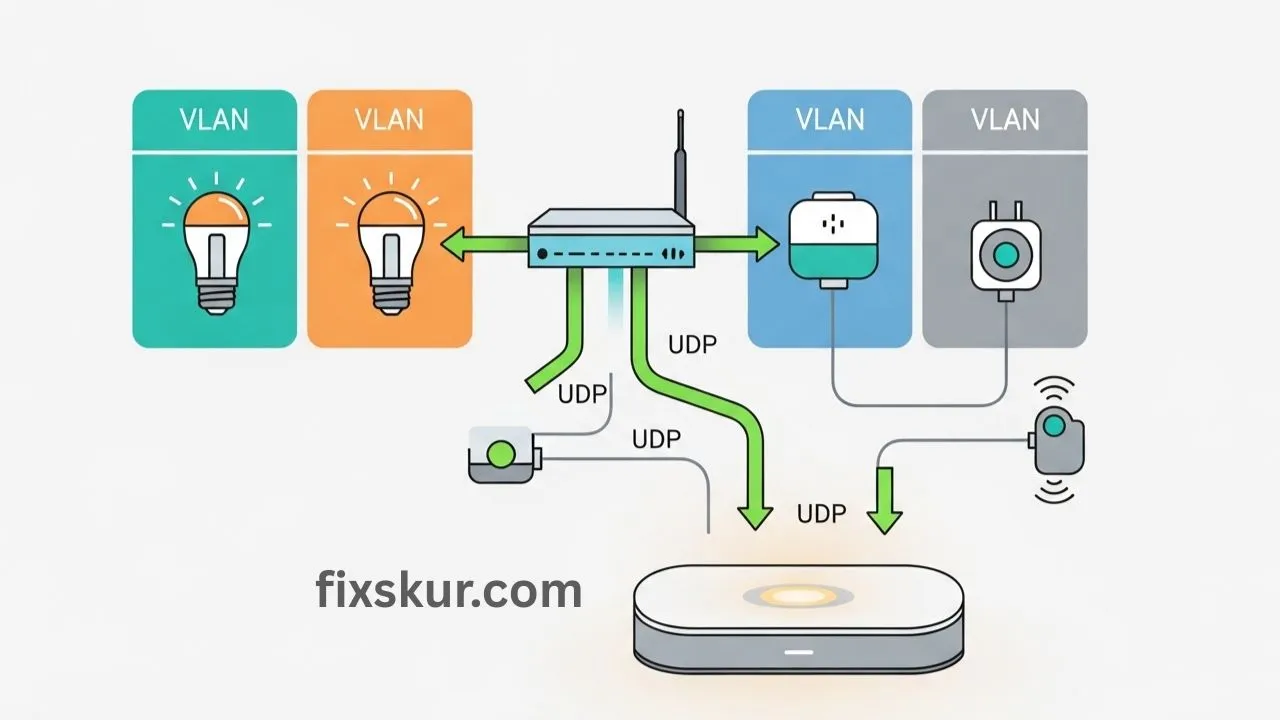
Alright, so here’s the core snag: Local Tuya mainly depends on UDP broadcast packets when it’s trying to sniff out your devices. To put it simply, imagine you’re just yelling into a single room – every soul in there will definitely hear your voice, no problem, but that sound just won’t magically extend into the next room without a dedicated arrangement to carry it over.
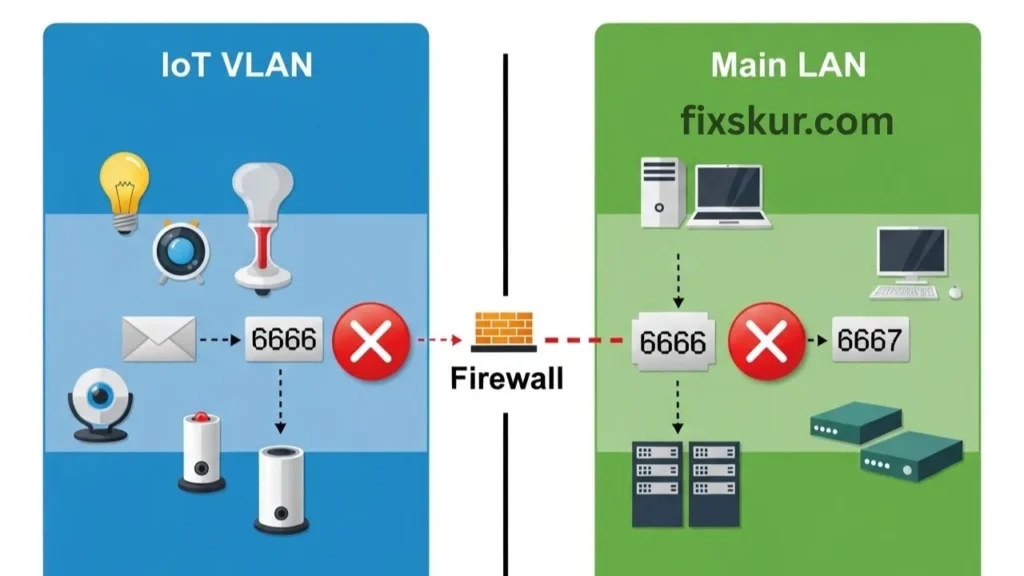
When your Tuya gadgets are sitting pretty on, say, your IoT VLAN, and Home Assistant is happily humming on your main LAN, those crucial UDP broadcasts (on ports like 6666 and 6667) typically don’t hop across VLAN lines. This means that the Home Assistant is yelling, but the Tuya devices can’t hear it, and vice versa. This is why you’re seeing “no devices found,” even though the devices are powered on and connected to Wi-Fi. This is not an issue with mDNS, which people often think, this is specifically a problem with broadcast packets.
My Personal Struggle with Home Assistant Local Tuya VLAN Setup
I remember when I set up my first IoT VLAN. At that time, I felt like I was a complete network magician! 😅 But the real test came when I tried to add my Tuya devices through Local Tuya. The result? Nothing. Zero. Just silence. The excitement turned into frustration.
I checked the Wi-Fi, restarted my Home Assistant, even restarted the devices. But still nothing. Then I searched through forums, watched dozens of videos on YouTube, and even read through issues on GitHub about the Home Assistant Local Tuya VLAN. Everywhere I found different solutions or sometimes no solution at all. Days went by in trial and error, staring at firewall logs, and shouting at the router. But finally, I solved the puzzle. So, let me save you a bit of headache.
Let’s now move towards practical solutions. The goal is simple: to get UDP broadcasts to flow properly between Home Assistant and Tuya devices.
Practical Solutions for Home Assistant Local Tuya VLAN Issues
Step 1: Verify Network Configuration Basics
Ensure your basic network setup isn’t the issue before jumping into advanced stuff. Here’s what to check:
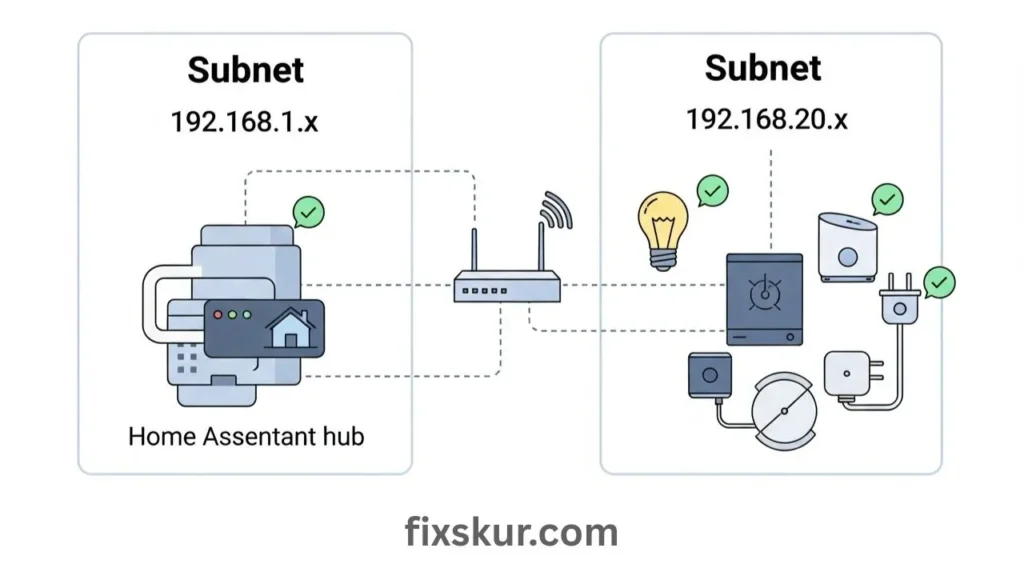
- Check IP addresses and subnets: Ensure your Home Assistant instance is obtaining the correct IP address on its main VLAN or Home Assistant VLAN (like 192.168.1.x).
- Check connection of Tuya devices: Make sure they are connected on the IoT VLAN and have obtained the IP address of that subnet (like 192.168.20.x).
- Use static IP: It’s best to give smart devices a static IP on the IoT VLAN. This makes troubleshooting a lot easier in the future.
Step 2: Temporary Full Access (Use with Caution)
Sometimes, the fastest way to confirm the problem is with the network (not Local) is to provide temporary full access. Do proceed with caution. The issue with your devices could be related to temporary restrictions on the firewall between your HA VLAN and IoT VLAN. Although this is not a permanent solution, it is risky for security. However, if this leads to sudden discovery working, then it is clear that the problem lies within the firewall rules.
My experience: I have used this hack many times. It is great for the sanity check but as soon as the devices are added, immediately reinstate the firewall restrictions.
Step 3: Configure Firewall Rules for UDP Traffic
The real fight is usually with the firewall. Whether it’s your router (like the UniFi Dream Machine, pfSense, OpenWRT, etc.) or a dedicated firewall appliance, the default setting is to block traffic between VLANs. Here we have to create specific exceptions.
First off, you absolutely must ensure your firewall rules give a green light to established and related connections flying between your Home Assistant and IoT VLANs—that’s the bread and butter for any consistent chatter. Then, here’s the kicker: Local Tuya sniffs out devices using UDP ports 6666 and 6667 (and occasionally, just to keep you on your toes, 6668!). So, get ready to craft some firewall magic, letting that UDP traffic zip from your IoT VLAN over to your HA network and back again during that initial hunt for devices.
- Source: Subnet of the IoT VLAN (for instance 192.168.20.0/24)
- Destination: IP address of the Home Assistant instance (for inbound discovery) and IoT VLAN (for the outbound scan from HA)
- Protocol: UDP
- Ports: 6666, 6667 (and 6668 if needed)
If you have a UniFi Dream Machine (UDM), these settings are configured in the “Traffic & Firewall Rules” section. For pfSense or OpenWRT, you will need to go directly into the firewall settings and add these rules. Keep in mind, the order of the firewall rules matters — usually, allow rules should come before deny rules.
Once it’s completed, this rule is crucial for ongoing communication.
Step 4: Set Up UDP Broadcast Relays
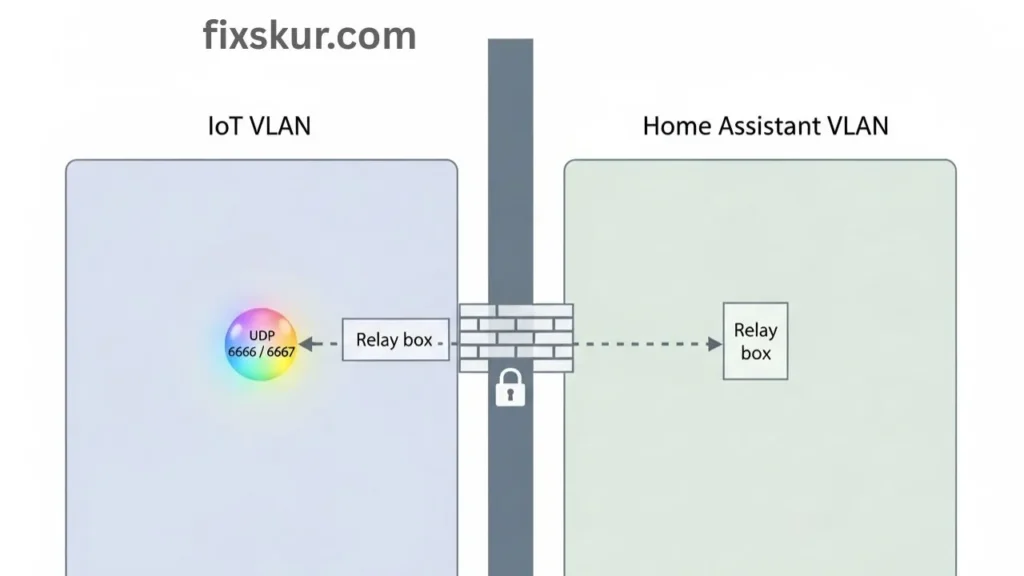
Because raw UDP broadcasts don’t cross VLANs, we need a setup that can relay or reflect them. This is the most effective solution for Home Assistant Local Tuya VLAN troubleshooting.
UDP Broadcast Relay / Helper
Many advanced routers and firewalls (think pfSense, OpenWRT, or OPNsense) often come with a “UDP Broadcast Relay” or “UDP Helper.” It essentially grabs broadcasts from one VLAN (say, your IoT) and then re-sends them out on another (your Home Assistant’s VLAN).
Normally, you would configure this to relay traffic for UDP ports 6666 and 6667 (and occasionally 6668) between the IoT network interface and the Home Assistant network interface.
My Local Tuya issue was finally resolved when I discovered the UDP Broadcast Relay package for my OpenWRT router. It was a total game-changer! Suddenly, my devices started showing up in discovery. Imagine you’re yelling in a small room, and then someone hands you a megaphone that’ll blast your voice loud and clear into the next room.
mDNS Reflectors for Other Devices
Now, let’s chat about mDNS Reflectors/Repeaters. While Tuya’s own discovery isn’t exactly built on mDNS, a whole bunch of other smart devices – like your Apple HomeKit gadgets, Chromecasts, or Sonos speakers – actually rely heavily on it. If you get an mDNS reflector or repeater up and running on your router or firewall, those devices will suddenly be able to spot each other across your different VLANs without breaking a sweat.
This is a good practice for running a segmented and smooth smart home, even if it doesn’t directly solve your Local Tuya discovery problem.
Step 5: Temporary Internet Access for Tuya Devices
Sometimes problems are not due to the entire network. It might sound strange, but some users have reported that Tuya devices require temporary internet access for the initial handshake or to get the local key — even if you are using Local Tuya. Once the device is added in Home Assistant, you can permanently block its internet access.
Here’s what I do: I first add the device in the Tuya app, I extract the Local Key from the Tuya IoT Platform, and until the Local Tuya integration is successful, I temporarily allow internet on the IoT VLAN. Once everything is set up, the internet connection is disconnected.
Step 6: Manual Configuration as a Last Resort
If everything else fails, manual configuration is the last resort: if you have the device’s IP, Device ID and Local Key, you can manually add that device to Local Tuya — this way you can skip the discovery process and add it directly. The Device ID and Local Key are obtained from the Tuya IoT Platform; you can find them on the internet…How To find AFI Guides.
It is also important to keep the Home Assistant and Local Tuya integration always updated — bugs keep getting fixed and improvements are continuously made.
Post-Configuration Checks for Home Assistant Local Tuya
Ping the IP of that Tuya device from the Home Assistant server. If a reply comes, then at least basic IP routing is working fine.
If you want to do some advanced diagnosis and if the router/firewall allows, you can run a packet capture (like Wireshark) and check on both VLAN interfaces whether UDP broadcasts are going from one VLAN to another or not. This is a bit of a techy step, but it’s very powerful for understanding network issues.
Final Thoughts on Home Assistant Local Tuya VLAN Success
Yes, all this might seem like a deep-dive into networking and frustration is normal — but don’t lose courage. The security and local control that comes from properly configured VLANs and Local Tuya is definitely worth the effort.
Remember my struggles, and know that you are not alone. In this journey, take each step, verify every change, and celebrate small wins. Once all of this is set, your smart home will become more robust, private, and faster – and that sense of achievement will be priceless.
Explore more guides:
- Solving Mini-PC Power Management Glitches
- M-Series MacBook DisplayLink Dual Monitor Fix
- Fix the “Phantom Notification” Sound on Android